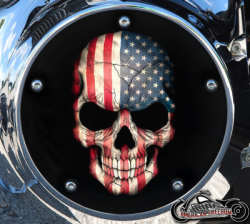
That round cover on the left side of your Harley has more visual real estate than most riders give it credit for. A Twin Cam derby cover sits low, catches light at every stop, and gives your bike a place to show exactly what it stands for. Leave it stock and it blends into the background. Put the right artwork on it and the whole primary side of the bike gets a new attitude.
For a Twin Cam owner, this is not about tossing on another generic chrome part. It is about choosing a piece that fits your specific primary, survives real miles, and looks like it belongs on your bike - whether that means a battle-worn skull, Old Glory, a dark angel, your club logo, a personal photo, or artwork nobody else is running.
What a Twin Cam Derby Cover Actually Does
The derby cover is the removable round cover on the outer primary. Behind it is the clutch assembly area, which is why the part needs to seal correctly, not just look good. Riders often remove it for clutch service or inspection, but it also happens to be one of the cleanest, most visible spots for custom artwork on a Big Twin.
On Twin Cam Harleys, the derby cover is usually a five-hole design, but “usually” is not a fitment guarantee. Harley built Twin Cam-powered machines across multiple families and years, and primary covers, aftermarket primary setups, and previous owner modifications can change what fits your ride. The right cover should sit flat against the primary, line up with every mounting hole, and work with the correct gasket or O-ring arrangement for that application.
That is why a decorative cover should never be treated like a universal accessory. It is a functional engine part with a front-row seat.
Twin Cam Derby Cover Fitment Comes First
A graphic can take your breath away, but it does not matter if the bolt pattern is wrong. Before you order, identify your bike by year, model, and engine platform. Twin Cam production broadly covers 1999 through 2017 Big Twin models, but a model-specific fitment check is still the smart move.
Check the Primary, Not Just the Engine Name
A bike can have a Twin Cam engine and still carry details that make broad assumptions risky. Custom primary covers, conversion parts, and replacement components are common on older Harley builds. Look at the cover currently on the bike. Count the fastener holes, inspect the shape, and compare the mounting layout to the part you are considering.
Also pay attention to the fasteners. Some setups use socket-head bolts, while others use decorative hardware. A new derby cover may accept your existing hardware, but you should confirm the hardware is the correct length and has clean threads before reinstalling anything.
Here are the four details worth confirming before you pull the trigger:
- Your Harley’s exact year, model, and Twin Cam configuration
- The number and placement of the mounting holes on your existing derby cover
- Whether the bike has an aftermarket or custom primary cover
- The required gasket or O-ring style for your primary
It takes a few minutes. It can save you from a part that looks killer on the workbench but never gets bolted to the bike.
Do Not Force a Cover Into Place
A derby cover should settle into position without persuasion. If holes do not line up, stop. Running bolts down at an angle or tightening one side to pull the cover into place can damage threads, distort the cover, or create a leak path.
When fitment is correct, install the cover with the proper seal, start all fasteners by hand, and tighten them evenly in a crisscross pattern. Use the service manual specification for your exact model rather than guessing at torque. Overtightening is just as bad as undertightening when you are working around a sealing surface.
Pick Artwork That Carries the Bike’s Personality
The best custom parts do more than match paint. They make the bike feel claimed. A Twin Cam derby cover can become the detail that ties together your tank graphics, saddlebag art, military service tribute, shop-built theme, or one-of-one identity.
Patriotic graphics hit hard on a blacked-out touring bike or a stripped-down Dyna. A We The People flag, weathered stars and stripes, eagle, or service-inspired design can put American steel front and center without saying a word. For a darker build, reapers, skulls, flames, ravens, demons, and Day of the Dead artwork give the primary side some teeth.
Then there are the designs that cannot be pulled from a shelf anywhere else. Your own tattoo art. A family photo. A memorial image. A business logo. A unit insignia. A hand-drawn piece from someone who matters to you. This is where custom imaging earns its keep. The motorcycle already tells people you ride. The artwork tells them why.
There is a trade-off, though. Tiny details and small text can disappear on a round part that is only a few inches across. High-contrast artwork generally reads better from a few feet away than a crowded design filled with miniature elements. If a logo is the point, make it big enough to own the cover. If a photograph is the point, choose one with a clear subject and strong lighting.
Why the Finish Matters More Than a Pretty Preview
A derby cover lives close to heat, road grime, rain, cleaning products, boots, and the occasional careless wrench. A design that looks sharp on a screen needs a finish built for the real world.
Precision-machined parts give the artwork a clean foundation. From there, a high-heat hard-coat imaging process creates full-coverage, photo-quality color that is made to hold up instead of peeling like a bargain decal. The difference shows after seasons of riding, washing, and parking in the sun. You want the image to remain part of the part, not become another maintenance project.
That durability does not mean abuse it. Avoid harsh abrasives, aggressive solvents, and scraping tools when you clean around the cover. Wash it like the custom piece it is: mild soap, water, a soft cloth, and a little respect. If you are doing primary work, set the cover face-up on a clean towel so the artwork does not get scratched by a concrete floor or a cluttered bench.
Made-to-Order Beats Cookie-Cutter Every Time
There is nothing wrong with a plain replacement cover if plain is what you want. But most riders do not spend time dialing in bars, pipes, wheels, suspension, seats, and paint just to stop at a blank engine cover. Small custom parts are where a build becomes personal without tearing the whole bike apart.
Custom Derby Cover gives Twin Cam riders a way to put ready-made artwork or their own image on a functional, vehicle-specific part. That means you can run a gunfighter graphic today, a personal logo on the next build, or get whatever image that your heart desires when the bike calls for something no catalog can predict.
Made-to-order work also asks for a little patience and accuracy. Confirm fitment before ordering. Review your artwork carefully. If you are sending a personal image, start with the best file you have, not a blurry screenshot pulled from social media. A crisp original gives the finished cover the kind of detail that gets noticed at a fuel stop.
Give Your Primary Side a Reason to Be Seen
A Twin Cam derby cover may be a small part, but it sits in a spot no rider can ignore once the bike is parked. Choose the correct fitment, run artwork with a clear point of view, and take care during installation. Your Harley does not need another piece of factory-approved filler. It needs a mark that says the machine is yours long before the engine fires.