
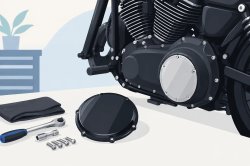
That scratched-up stock derby cover is sitting in plain sight every time you throw a leg over your Sportster. It is a small part with a big visual job. If you are wondering how to replace a Sportster derby cover, the good news is that it is one of the cleanest ways to change the attitude of your bike without tearing into the engine.
A derby cover swap is straightforward when you respect three things: correct fitment, a clean gasket surface, and the proper torque procedure for your specific year and model. Rush any of those, and a simple custom upgrade can turn into a primary leak or stripped screw holes. Take your time, use the right tools, and your Sportster can wear artwork, a personal logo, a flag, a skull, or whatever image your heart desires right where people are going to see it.
Before You Replace a Sportster Derby Cover
First, confirm that the new cover is built for your Sportster's exact fitment. Sportster derby covers are not all interchangeable. Bolt count, bolt pattern, cover diameter, and clutch mechanism clearance can vary across generations. A cover for a Big Twin or Milwaukee-Eight is not automatically right for an 883 or 1200 Sportster.
Check your motorcycle's year, engine family, and the number of derby-cover fasteners before ordering or installing anything. Also inspect the backside of the replacement cover. The machined surface that meets the primary cover must be clean, flat, and free of shipping damage. A killer graphic means nothing if the cover cannot seal.
You will want a stable place to work and enough room on the left side of the bike. Put the motorcycle on a level surface and allow the primary case to cool completely. Hot primary fluid and painted finishes are a bad combination.
For most installs, gather a Torx or Allen driver that matches your derby-cover screws, a hand torque wrench that reads low inch-pound settings, a plastic scraper, clean shop towels, brake cleaner or another residue-free surface cleaner, and a new derby-cover gasket if your model uses one. Have a shallow drain pan ready as well. Depending on the Sportster year, the bike's position, and fluid level, a small amount of primary fluid may come out when the cover is removed.
Do not attack the old gasket with a screwdriver, razor blade, or anything that can gouge aluminum. The sealing surface is not the place to prove how tough you are.
How to Replace a Sportster Derby Cover Step by Step
1. Stabilize the bike and protect the work area
Keep the Sportster upright if you have a lift or a secure stand designed for the job. If you are working with the sidestand down, expect the angle of the bike to affect how much fluid sits against the primary cover. Place a drain pan beneath the derby cover and lay a towel under the work area to protect the finish on the primary case.
If your replacement cover has a hard-coated custom image, keep it face-up on a clean towel until installation. Do not slide it across concrete, a workbench full of metal shavings, or the old cover. Custom Derby Cover parts are made to bring full-coverage artwork to the fight, but even a tough finish deserves smart handling during the install.
2. Loosen the screws evenly
Break each derby-cover screw loose gradually in a crisscross pattern. Do not fully remove one screw while the others are tight. Backing them out evenly prevents the cover from cocking against the gasket and reduces the chance of stressing the threads.
Once all screws are loose, remove them and set them aside in a clean tray. Inspect each one for damaged threads, rounded heads, or corrosion. Replace questionable hardware rather than gambling on it. A fresh derby cover deserves fasteners that can be removed again without a fight.
3. Remove the old cover without forcing it
The old cover may lift off easily, or it may be lightly held by the gasket. Pull it straight outward with gentle, even pressure. If it sticks, tap around the cover lightly with the palm of your hand. Avoid prying between the cover and primary case with a metal tool.
As the cover comes free, watch for any fluid drips and note how the old gasket is positioned. Some setups use a reusable O-ring-style seal, while others use a flat gasket. Your service manual and replacement gasket instructions should decide what gets reused, not guesswork.
4. Clean both sealing surfaces
Remove every trace of old gasket material from the primary cover and the back of the old cover if you are inspecting it for reference. A plastic scraper and a clean rag are usually all you need. Follow with a light wipe of residue-free cleaner, then let both surfaces dry.
Look closely at the primary cover's sealing lip. Deep scratches, dents, or old sealant piled into the groove can cause a leak even with a new gasket. If you find significant damage, stop before installing the new cover and address the sealing surface properly.
This is also the time to resist a common mistake: coating the whole gasket in silicone. Many derby-cover gaskets are intended to install dry. Excess sealant can squeeze inward, contaminate the primary, and create more trouble than it solves. Use a sealant only if your motorcycle's factory service information or gasket manufacturer specifically calls for it.
5. Position the gasket and new cover
Place the new gasket on the clean primary surface, lining up every bolt hole. If it is an O-ring-style seal, make sure it is seated fully in its groove and not twisted or pinched.
Set the new derby cover straight into place. Do not drag it across the gasket. The bolt holes should align naturally. If they do not, remove the cover and find out why. Never use the screws to pull a misaligned cover into position. That move can pinch the gasket, cross-thread hardware, or damage the cover.
Thread all screws by hand first. Each screw should turn easily for several threads. If one gets tight immediately, back it out and start again. Aluminum primary threads are strong enough for their job, but they are not forgiving when cross-threaded.
6. Tighten in a crisscross pattern
Snug the screws gradually in a star or crisscross pattern so the cover draws down evenly. Then use a calibrated torque wrench and tighten the fasteners to the exact specification listed for your Sportster year and derby-cover hardware in the factory service manual.
That specification matters. Torque values can differ by model year, fastener size, and cover design. Going by feel is how riders strip primary-cover threads or warp a cover trying to stop a leak that proper preparation would have prevented. Tight is not a torque spec.
After the final pass, wipe the area clean so any fresh seepage will be easy to spot later.
Check Your Work Before You Ride
Let the bike sit for a few minutes, then inspect the perimeter of the derby cover for fluid. Start the motorcycle and let it idle while you watch the seal. A quick look after a short ride is smart too, especially if the bike leaned hard on the sidestand during the swap.
If you see a leak, do not keep tightening screws blindly. Shut the bike down and determine whether the gasket shifted, the sealing surface was dirty, the cover is incorrect for the application, or the fasteners were not torqued correctly. Most derby-cover leaks come from one of those issues, not from a lack of brute force.
When a Simple Cover Swap Is Not So Simple
Some Sportster service procedures require derby-cover removal as part of clutch adjustment or primary service. That is different from replacing the cover for looks. If you are only swapping a cover and do not disturb the clutch adjuster or related components, you typically are not performing a clutch adjustment. Still, your year-specific service manual gets the final word.
Be especially careful if you notice abnormal clutch operation, metal debris in the primary fluid, damaged threads, or a warped original cover. A custom cover is the finishing touch, not a bandage for a mechanical issue underneath.
Make the Left Side of Your Sportster Count
The left side of a Sportster gets plenty of attention at bike nights, gas stops, and red lights. That makes the derby cover more than a round piece of metal. It is a billboard for the kind of rider you are. A clean install gives that statement the respect it deserves.
Choose the right fitment, keep the gasket surfaces spotless, and torque the hardware by the book. Then step back and look at the result. Your Sportster does not need another cookie-cutter part - it needs a cover that sets your ride off every time the sun hits it.