A derby cover lives in a rough neighborhood. It sits low on the bike, catches road grit, takes heat from the engine, gets wiped down after fuel stops, and stays in full view every time the kickstand goes down. That is why cover finish durability is more than a marketing line. If you are putting a skull, a flag, a family photo, your club logo, or your own original artwork on the side of your motor, you want it to look mean years from now, not tired after one riding season.
A good custom cover has to do two jobs at once. It has to fit and function like a proper motorcycle part, and it has to carry the art without letting the road beat it into submission. The difference comes down to the metal underneath, the way the surface is prepared, how the image is applied, and what protects that image once the motor gets hot.
What Cover Finish Durability Really Means
Durability is not just whether a finish survives the first wash. On a motorcycle, it means the color stays sharp, fine details remain visible, and the surface resists the ordinary abuse that comes with putting miles on a machine built to be ridden.
For engine and body covers, that abuse usually includes heat cycles, vibration, UV exposure, rain, grime, bugs, wash chemicals, and the occasional careless boot or belt buckle. A cover can also see fuel splash during fill-ups and oily residue during routine maintenance. No finish is invincible, especially if it meets a curb or gets hit by a dropped tool. But a quality finish should not peel, fade fast, or turn cloudy from normal ownership.
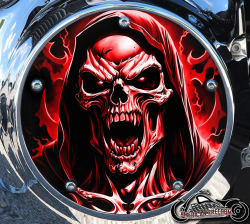
The artwork matters here. A detailed Dark Angel Reaper, weathered We The People flag, or high-contrast personal photograph has small visual elements that cheap printing can lose quickly. When the blacks go gray or the colors flatten out, the whole piece loses its punch. A durable finish preserves the reason you bought a custom cover in the first place: to set your ride off with something nobody else is running.
The Foundation Starts With the Part
Finish performance starts before any image touches the cover. A precision-machined part gives the finish a consistent surface and gives you the fitment you expect when you are bolting it onto a Harley-Davidson Big Twin, Twin Cam, Milwaukee-Eight, or Sportster platform. The same principle applies to timing covers, inspection covers, horn covers, fuel doors, and console covers.
Surface preparation is where shortcuts show themselves. Metal needs to be clean and properly conditioned before it receives a decorative finish. Oil, machining residue, dust, or fingerprints can interfere with adhesion. That might not be visible on day one, but it can become a weak point after repeated heat and vibration.
Fitment also affects the life of the finish. A cover that does not sit correctly can create uneven pressure around the mounting points or invite rubbing where there should be none. Before ordering, confirm your model, engine family, and cover style. Before installation, compare the new part with the one coming off your bike and use the correct hardware and torque procedure for your motorcycle. A killer design means nothing if the wrong part gets forced into place.
Heat Is the Real Test
Engine covers are not wall art. They live beside moving metal and rising temperature. The finish has to remain stable as the cover warms up during a ride and cools down afterward, again and again.
A high-heat hard-coat imaging process is built for that job. Rather than treating the graphic like a temporary decal laid over a finished part, the goal is to create a full-coverage image protected by a hard finish that is made to handle motorcycle conditions. Done right, the art looks integrated with the cover instead of sitting on top of it like an afterthought.
That does not mean heat can be ignored. Engine temperatures vary by bike, riding style, weather, tuning, traffic, and airflow. An air-cooled V-twin stuck in stop-and-go summer traffic is dealing with a different environment than a bike moving steadily down an open highway. If your motorcycle is running unusually hot, address the mechanical cause. A cover finish should not have to compensate for an engine problem.
Hard-Coat Imaging vs. Cheap Surface Decoration
There is a reason some custom parts look great in product photos but lose their edge in the real world. Many low-cost decorative methods depend on a thin surface layer, weak adhesive, or a finish that was never intended for sustained heat and weather. It may look fine in a garage. Put it through sun, rain, wash products, and vibration, and the weak link starts to show.
The trade-off is simple. A properly made, made-to-order cover takes more care than a mass-produced sticker-bomb part. You are paying for a purpose-built component, accurate artwork, and a process intended to keep that image looking hard. At Custom Derby Cover, full-coverage, photo-quality artwork is hard-coated onto precision-machined parts because the finish has to earn its place on a running motorcycle.
Be realistic about the kind of damage no finish can prevent. Rocks can chip metal. Brake cleaner, harsh solvents, and aggressive abrasives can scar protective layers. A crash can grind through just about anything. Durability means the finish is ready for normal riding life, not that it gives your cover superpowers.
How to Keep a Custom Cover Looking Badass
Basic care goes a long way, and it does not require turning your bike into a museum piece. Let a hot engine cool before cleaning it. Spraying cold water or chemicals onto a scorching cover is rough on any material and does not make cleaning easier.
Use a mild motorcycle-safe wash product, clean water, and a soft microfiber cloth. Rinse away loose grit first. Dragging dry road dust across a glossy or detailed image is how tiny scratches build up over time. For stubborn bugs or grime, soak the area gently rather than attacking it with a stiff brush.
Keep strong solvents away from the finished face of the cover. That includes brake cleaner, carb cleaner, acetone, paint thinner, and harsh degreasers unless the product directions specifically say they are safe for coated decorative surfaces. If you are doing engine work, cover the artwork with a clean cloth before spraying nearby components. It is a small move that saves a lot of regret.
Avoid abrasive pads and gritty polishing compounds. They can dull the sheen and soften crisp image detail even when there is no obvious gouge. If you use a protectant, choose one intended for coated motorcycle surfaces and test it on a discreet area first. Products that promise a fake wet shine can sometimes leave residue or create streaking on dark graphics.
Watch the Mounting Area
The face of the cover gets all the attention, but the mounting points deserve care too. Use the correct fasteners, tighten them evenly, and do not overtighten in an effort to make the cover feel extra secure. Excess force can damage threads, distort the part, or mark the finish around bolt holes.
During routine service, inspect the edges and hardware. If you see oil weeping from a gasket area, fix it instead of letting it collect dirt against the cover. Clean oil residue carefully with a mild product after the repair. A clean, properly sealed engine keeps custom parts looking sharper and makes future maintenance less of a mess.
Color, Detail, and Your Real Riding Conditions
The best design for durability is often the one you will be proud to clean and inspect. High-contrast art, deep blacks, strong reds, patriotic graphics, and bold line work all make a statement. They also show dust, water spots, and fingerprints differently.
A dark cover can look absolutely vicious against polished metal or chrome, but it may need more frequent wiping if you want it spotless. A weathered flag, vintage pin-up, distressed skull, or grunge-style design can hide minor road dust better because the art already carries texture. Neither choice is better. It depends on whether your bike is a weekend showpiece, a cross-country mile eater, or both.
If you are creating a one-off cover from a personal photo or logo, start with the cleanest image you can provide. A sharp original file gives the artwork the best chance to retain fine detail when it is scaled to a compact round or oval part. Blurry screenshots and heavily compressed images can still be meaningful, but no finishing process can invent detail that was never there.
Your bike should carry your story, not a generic catalog look. Choose art you will still want to see every time you walk back to the machine after a long ride. Then give that finish the same respect you give the motor behind it: clean it right, install it right, and let the miles prove what it is made of.